Thursday, December 29, 2011

Music to My Ears

I just loved hearing about the projects you stitchers cooked up for holiday gifts.

Letty O. shared these photos of musical clefs that she stitched then mounted to a cigar box. What a neat finishing idea! As you can see, she changed the clef colors on First Bass to match the Treble (you're allowed to do things like that , you know!), then extended the staff line, as would be done on sheet music.  How cool is that.  Wouldn't you love to see that under your tree?  Letty, thanks for sharing this great idea and your lovely work.


Here's another shot of some Ink Circles Christmas love- this time with the happy recipient in the pic.  This is Max and his 99 sampler. Max likes beer and even brews his own. (I've seen the hop plants he has growing!) Have a Merry Christmas, Max! This special moment was brought to you courtesy of stitcher Sue in Pendleton, Max's mom.

Thanks everybody for the wonderful support and fun in 2011. I wish you all the most spectacular fantabulous 2012!

Cheers,
Tracy

Thursday, December 8, 2011

Geeky Tools for Geeky Socks

If you subscribe to Knitty.com, you already know they have a wide variety of fun knitting patterns for free.  You have to learn to knit, after all, you can't really cross stitch it near total darkness or when your eyes are wonky.

May I direct your attention to these fun filled socks by Heatherly Walker (aka Yarn Yenta).  Now, aside from acknowledging they are very cool socks and wondering whether a sock designer's real name is "Walker," you may also be wondering why I'm  posting about them.


Well, if you scroll down in the pattern, you will see that Heatherly is a happy Ink Circles customer and used some wonderfully appropriate stitch markers that I made for her.


Wow, I feel so famous now.  Should you want to order your very own set of geeky stitch markers made from capacitors, resistors, light bulbs and other leftovers from my engineering days, I have a number of sets over in my Etsy shop


I know you'll want to download her pattern if you haven't already: Microprocessor Socks.  I think I will make mine in green and silver.

Very cool additional note: Heather has just told me that her socks (complete with the circuit board and resistors display) have been selected to be part of an exhibit on science influencing crafts.  Is it still cool to say awesomesauce?!?

Monday, October 31, 2011

Rubber Meets the Road

The first steps down a new path for Ink Circles have been taken.  A lot of you know how much I love ink work, and many of you have heard me explain, "Sorry - this new drawing I did just won't convert well over to cross stitch."  We could go into the basic 17 types of symmetry and which ones would convert nicely and for which order (fold) they would work, but we'll save that for the math blogs.

A friend convinced me that my non-stitchable designs, however, WOULD be pretty cool as rubber stamped images. So, here is a peek at a few prototypes. I wanted to have a few in hand to play with before ordering up the etched metal plates and investing lots of moolah. I found a company that would make up a one off using a LASER to etch the design into real rubber.  Simon Stamp seems to have done a nice job, with the design printed on the back of the wood block - nice professional touch.  This won't be the same company the final ones will be from, as I'll be switching over to a company that's business model is to economically make bulk quantities. 

The designs are 4" across. It's my thought that it should give a big enough motif to be the main design on a card or something.  Anything smaller and it might be too hard to color or layer.  I'm hoping to offer both wood-mounted and cling-style.


Below is my original painted version of the right-hand stamp.  I hope that crafters will find these fun to make and color. Tomorrow they are going to be sent off to my friend Diane in Virginia. I can't wait to see what she does with them. She makes amazingly awesome layered and embellished things and has promised to make up some samples to show them off and explore some different ways to use them.  She'll also be able to confirm whether image size and level of detail is optimal.

Initially, I'll be focusing on mandalas, but might dabble in Celtic or ...
I'll be sure to share more with you as I move along the path and definitely a heads up when they are available for sale.
I'm anxious to hear from you what you think regarding anything from mount types to images to sizes.  And, if any of you have any experience making/selling stamps I would love to hear any input you have from that angle.  

Thursday, October 20, 2011

WYSI-NOT-WYG

Okay, I'm done freaking out about this.  A few days ago I showed you Metamorphosis. The picture was taken in my front garden in diffuse daylight. I thought it looked pretty good on the screen with the light orangish fabric (somewhat overexposed) and the sweet purple asters.  I tootled over to the print shop later that afternoon to review the final proofs (truly a just-in-time job to make the online show deadline.) I was horrified.

Those flowers - BLACK background with gaudy dark smudges.  The fabric had become a creepy yellow color.  Everything was dark and ugly.  No can print. You can read all you want about subtractive colors and additive colors that translates to the pictures that look nice on your screen usually suck when you print them. I hadn't ever seen one of mine come out quite this bad.

An amazing thing, I was going to take a picture to show how unlike the screen photo the hard copy was. I had the screen and the print in my camera viewfinder and damned it the two colors hadn't changed yet still - the print actually looking more appropriately orange and rich than the screen. Oooh, mind games.

I have since retaken photos in just about every light setting, using every camera setting, every photoshop tweak I knew, every publishing program adjustment, and I still struggled.  Maybe it's just harder with the more saturated colors.  I want the printed photo on the chart to be accurate enough in color that if someone were to order the same fabric, they wouldn't be surprised when the parcel arrives.  It might be a touch more orange than you like! Now it looks super-orange on the screen, particularly with the new backdrop, but it prints so much better than the first.


Well, the online show has officially opened - I can tell, because "interesting things" have started showing up in my inbox. I'm waiting for my printer to call that the charts are ready for pickup. I have about 2 TB of garbage photo attempts to clear off my hard drive.  I think it's time for a cup of tea.

Monday, October 17, 2011

Changing Time

Just a few more days before the Online Needlework Show starts up (October 20-25.)  In my last post, I showed you the new Love Letters that I had finished up. Here is another preview for your perusal.  I give you...
Metamorphosis. Below, it presents a bit of an optical illusion to me - it looks like the photo is crooked, tilting down on the right. It also presents a bit of a challenge chart-wise. Like Namaste, 81/2 x 11" paper is not optimal for displaying long skinny things without lots of blank page.


This is the first in a series of charts where I’ve used Quaker motifs to illustrate a particular concept, in this case the transformation from one form into another. In seven steps the pot of flowers motif morphs into an octagonal design.  Seven shades of Gentle Art Sampler Threads also gently transition as the motifs change.  

I was going to call this Evolution, but didn't really want to get into any creationism-sparked arguments nor did I want to defend that an octagonal motif was somehow fitter than a pot of flowers.  So I leaned back on my initial inspiration, which was more Escher-like than anything, and settled with Metamorphosis.


If you get my newsletter (that was just mailed this afternoon) you got to see a sneak peek of a third new offering that I'll have for the Online Show. It's a piece by my Mum and is a bit different than your typical Ink Circles style, so we are releasing under her business name Norsk Needlework.  If you didn't get the newsletter, you'll just have to sign yourself up for such things so you don't miss anything.  Meanwhile, the design in it's entirety will be revealed at the show, along with all sorts of other cool thing from many designers.


Just a reminder that the Online Show is open only to Local and Online Needlework Shops.  We still invite the public to view and provide input to their shop owners.  In this economy, we're seeing a lot more of shops ordering only when nudged by their customers. So make your wish lists heard!

Sunday, October 9, 2011

Love Letters

After some initial confusion on assembling the metal frame (I only had three parts left over) I think it worked out even easier than the wooden ones. This is a new piece that will be available next week at the Online Needlework Show.


This is the second piece in a series called Love Letters. Each is a small sampler with an alphabet and a heart motif done in a particular style.  This one is Art Nouveau.  It's stitched up on Picture This Plus linen 32 count Mello with Gentle Arts Sampler Threads.

You may recall Love Letters - Celtic:


The next one I'm working on is Fraktur. Then what???

Tuesday, September 13, 2011

That Third Dimension

It looks like the JCS 2011 Ornament issue is arriving in peoples mailboxes and in the shops. I haven't got my copy yet, but I saw a picture of ornament I did for it. I wasn't sure how well the single photo would convey what it was, so I've got a few more pictures to show you.

It's a book. The red fabric "Tango" from Picture This Plus reminded me of the faded red leather of old books. I used Belle Soie to emboss a little pattern into my leather, then finished it with some felt pages. The back has the same border as the front with my initials and date, and a dainty pattern on the spine.


Wednesday, August 24, 2011

Brute force method

I tried to share a photo of the awesome version of Growth Rings that Jenn made by forwarding her link.  Sometimes Facebook thwarts me. This is worth sharing, so I've resorted to a more direct posting of the photo.  Thanks to Jenn (@jenn_ay_em on Twitter) - happy dancing with you!


Tuesday, August 23, 2011

Has anybody found a use for these yet?

I love them. I make them. You love them. You make them. But when somebody asks what its purpose is, we all start to falter.  Yeah, they look great in a little basket...  I suppose it could be a pincushion... They're perfect gifts (for friends who then get to figure out what to do with them.)

Ah, the biscornu. As I said, we love them, make them, share them.

You're on my newsletter list, right? This is the Celtic Swirls chart that you get when you sign up. Steff used 18 count cream aida and picked shades of brown (anchor thread numbers 308, 310, 360 and 891) for her exchange partner who loves browns. These really do make sweet little gifts and I'm sure her partner was pleased. Nice job, Steff!


So functionality be damned - stitch a biscornu today!

Tuesday, August 16, 2011

Jiggity Jig

After a wonderful weekend at the Baltimore TNNA show, I am home again (home again, jiggity jig.)

Hannah and I had a great time visiting with all of the other vendors and shop owners and partaking of the best crab cakes on the planet.  We brought six new releases, with the 99 Bottles of Beer probably being the most talked about (perhaps due to the five foot tall inflatable beer bottle we brought along.)  This was one of the "hotel-style" shows, where the vendors each set up the parlor room in their suite as a booth. It makes for some interesting improvisation for display. You can see the banners hanging from the railings facing the big open atrium in the center of the hotel.


As always, my head and my suitcases were about to explode on the way back.  I also had the chance to visit the Stitching Post, a cross stitch shop local to the area.  If anybody ever asks why we need to keep shops in the loop and not just buy everything off the internet, they need to visit places like this LNS.  It is so inspiring to be surrounded by all of the threads and fabric, to see models in person, and to chat with folks who are as passionate about the craft as you are.  It turned out that they had a feature wall of Ink Circles and Long Dog models stitched by Debbie, a local lady.  Impressive, and more so when I tell you that they are all on 28 over 1.


So much to do now that I am back, but I'm trying to convince myself that I can sit and rest for a few minutes and am being "productive" since the washing machine is washing all of our dirty clothes. Right?

Thank you to everyone who attended and to all of those stitchers who support those shops that came.

Monday, August 8, 2011

5 Steps Forward; 2 Steps Back

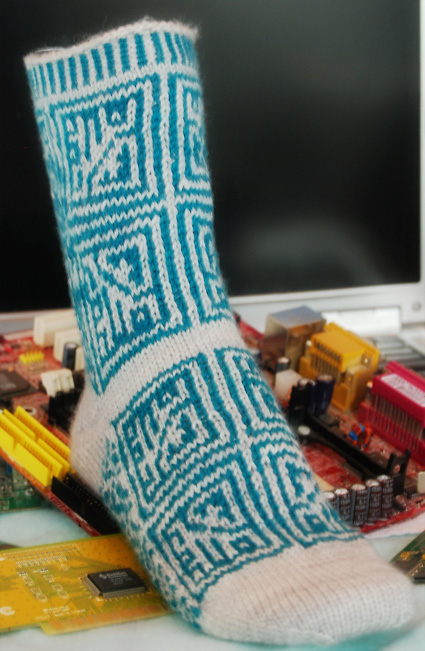
I've been asked many times how I finish my flat ornaments, like the clef series.  I do use this finish a lot because of how simply it goes together and how nice it usually comes out. I do use glue and double-stick tape, so some of you purists may be put off by this cheating and I give you this chance to avert your eyes.

Gather up your materials and tools. Press your stitched piece. I use acid-free mat board (the blue rectangle), wool felt, Warm & Natural quilt batting, and beads.
.
Cut a piece of mat board to the size you want your linen square. Use double-stick tape to stick on a piece of batting. Trim the batting (after you stick it) to the size of the square. This gives a little poofiness to the stitching.
Place double-stick tape around the perimeter of the back (un-batted) side of the mat board. I find the acid-free super-sticky kind with the red peel-off made for scrapbookers to work very well. Peel off the red backing to expose the sticky side. Trim your stitched piece if you have any long/wide sides.
Center the stitched piece over the batting and press the excess fabric into the tape areas, gently at first until it is lined up and straight. We'll be mitering the corners, so your front and back should like as below.


Now for the glue. I use "Fabri-tac" by Beacon Adhesives. This stuff is stinky (not for people with VOC sensitivity) and super sticky. Try very hard to not get any in places you don't want it. One corner at a time, put a blob inside each miter area and under the wings, then squash it down flat and hold it in place until it stays there.  Double-check which side is the top then add a loop of trim for hanging, using the glue to cement it in place. Draw a line of goo in a box about 3/8" inside of the outer edge.
Carefully place it (goo-side down) onto the backing felt. Allow plenty of room on each side. Press it down firmly then leave it alone for an hour or so to dry.  I set it outside where the heat not only dries it, but it drives off some of the out-gassing chemicals. Find a color of thread that best matches the backing fabric. I use beading thread; you could also use regular sewing thread. I would not use floss, as it might fray.

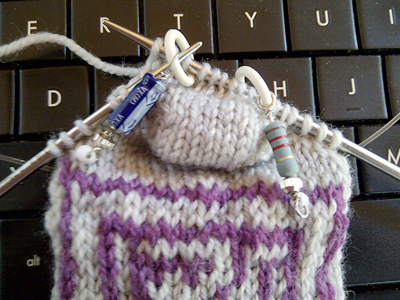
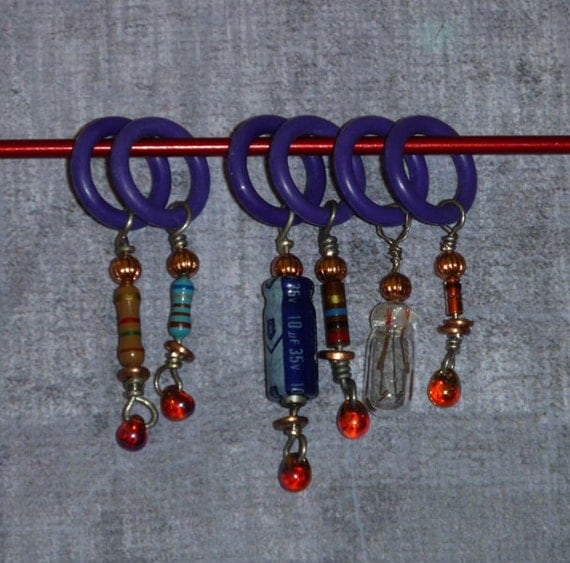
Rule 1 for beading -keep the needle out of the glue-y areas. If the glue is 100% dry, it is almost impossible to put the needle through. If the glue is <100% dry, you will gum up your needle beyond where you though possible.  So, tie a knot, hide it some where between the two layers and begin by stringing on five beads. Take the needle straight down into the felt exactly where the fifth bead ends. If you are a leftie, you may find it easier to go clockwise.
Bring the needle back to the front side just before the last two beads. Catch one thread of your linen as you come up. This thread you catch should be on the fold. If you do it right, you won't be able to see your stitch after the next step.
Bring the needle BACK through those last two beads.
Repeat those two steps and work your way around the perimeter of the linen. Five beads forwards, back through the last two. This anchors the felt to the stitching without having to have glue out at the edges and hides any gaps where the mitered corners are thicker. The back should have a series of small diagonal stitches visible. When you get back to the beginning of the circle, you will probably not need all 5 beads (80% chance against ;-) so add however many closes the gap. Take the backstitch if you added more than two. Run your needle through the first few beads you added to make a join, then take your needle to the back and tie it off, burying the end in the felt.


Pinking shears are a great investment! I love them. Just be careful to not pink off the ribbon hanger you so carefully added.
Ta da!

I hope you find this technique helpful. You can also use a twisted cord or some other trim instead of the beads.  Try it, then show me your finishes using it.

Monday, July 25, 2011

Growth Spurt

I just love seeing the same piece reinterpreted different ways.  Here are three most excellent examples of Growth Rings that have been shared recently.


First up, Mary finished hers using Crescent Colours Cupid for the red, and Weeks Dye Works Noel for the multi. It is stitched on 28 count African Daisy. This came out just lovely and will be even more so when Mary gets it framed. She's planning on having contoured mats to bring out the shape of the design. 
Mary also sent in a picture for her friend Christie, who also just finished up the chart.  Christie used Threadworks green and purple fibers on 28 count white.  What you can see, is that she's outlined all of the sections in backstitching, which gives a look of Assisi embroidery to all of the green areas. What a neat idea!

This last photo shows the synergy that is obtained by combining the design with beautiful stitching talents with the most exquisite of framers, Jill Rensel.  (Seriously, how many other framers are a household name to needleworkers?)


This is Christine's version. Absolutely stunning. So, Mary (with the first pic) if you had any doubts whether contour framing would look cool, please rest assured that it certainly does!

I should think all three of these stitchers would be terribly proud of their beautiful work. I am!  Thanks so much for sharing your lovelies, ladies. 

Friday, July 22, 2011

Size Does Matter

I've got an inbox full of wonderful things that folks have sent in since I last blogged, but have been kept busy enough that I hadn't shared them.  So, over the coming days, I hope to get a bit caught up.

To fully appreciate Nadia's finished piece, I would like you to pick up that pad of Post-Its from the side of your desk. Look closely at the size of the square.  Now look at her picture. I know people that don't like to (or can't) stitch on 36 count over 2 --- This was stitched on 36 over 1, and , yes, came out the size of a standard Post-It note. It's not as beautiful of a photo with the ruler in the shot, but I wasn't sure you would believe me without it. 


Nadia continues to push the stitching envelope and continues to amaze me with the fabulous projects she completes.  Join me in congratulations her on an awesome finish!  We can't wait to see what she does next.

This was a special mandala pattern that was only available through the Thread & Eye in London, Ontario. The Stitch Along is over but if you need a copy, they can help you out via mail order.  If you are looking for similar designs, I have Kaleidoscope available now, and a series of mandalas for the four seasons that were originally published in four issues of Just Cross Stitch Magazine which will be coming out as a single leaflet in mid-August.

Tuesday, June 21, 2011

A True Romantic

Jessica has finished up her Alchemical Romance sampler and it could have come out more lovely.  She used Vikki Clayton's silks on Picture This Plus "Ancient."  She said she took her color inspiration from these antique books.


The swap-out she made in the middle is wonderful. In the center of all the symbols meaning gold, she's added the symbol for lead in an appropriate lead-y color.  All I can say it that I wish I had thought of it :o).


Jessica has a very nice blog, if you'd like to see more of her stitching and the wonderful photographs she takes. I'm so happy she shared her finish with us. I hope it turns your morning golden as well.